Backyard Recycling Projects Anybody Can Do
Hey there, eco-friendly recycling lovers! I've got some super cool stuff to share with you today. If you're all about helping the world and reducing trash in sustainable ways, you're going to love this!
So check it out. Your yard is like an extension of your house, right? You want it to match your style, your personality, your budget, and most importantly, your values. And if you're into recycling and being kind to Mother Earth, I've got 10 awesome lawn and garden ideas that use recycled stuff. How cool is that?
Alright, let's dive in!
Pallet Garden
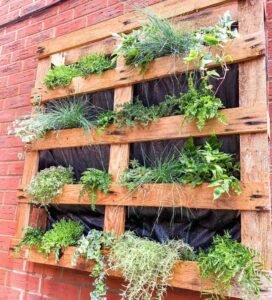
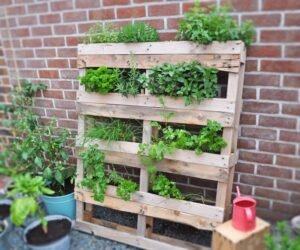
This is dope! You just grab an old pallet (hit up your local supermarket, big box store, or warehouse, they've usually got extras lying around), some landscape fabric, chicken wire, soil, plants, and a staple gun. Back that pallet with the landscape fabric, staple on the chicken wire, hang it up, add your soil and plants... Boom! Vertical garden, baby!
For this DIY lawn and garden craft you’ll need:
- Pallet (you can often find them stacked behind warehouse stores and supermarkets)
- Hanging hooks or a means to hang the pallet from your home or fence
- Soil
- Plants landscape fabric
- Chicken wire
- Staple gun
Directions:
Back the pallet with landscape fabric. You’ll want to overlap it a bit so you can staple the fabric around the edges of the pallet. If you’re concerned about the fabric ripping, consider doubling it up.
The next step is to staple the chicken wire around the back of the frame. Again, overlap the edges of the pallet. Cut off any sharp points. Hang the pallet where you want it to be placed on your fence or wall. You might find it’s easier to add your plants when it’s hanging. If not, then lay it on the ground and add your plants.
Place your soil in the holes in the pallet and position your plants as you wish. Herbs work very well for a vertical garden. Succulents are also nice and you can really pack succulents in to make a full board of greenery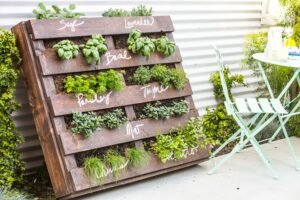
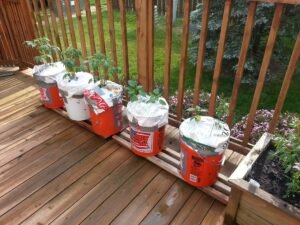
Bucket Planters
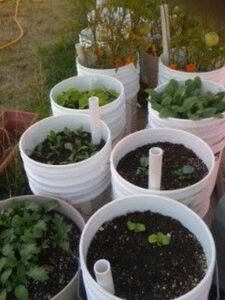
Snag some old metal or plastic buckets from the thrift store or recycling center. Decide what you wanna grow - veggies, herbs, flowers, whatever floats your boat. Grab some gravel for drainage, potting soil, plants, and spray paint those buckets to match your style. Drill a few holes in the bottom, layer in the gravel and soil, add your plants, and you're good to go!
For this DIY lawn and garden craft you’ll need:
- Buckets
- Drill
- Potting soil
- Plants
- Medium-size gravel, for drainage
- Spray paint
- Newspaper for spray painting
Directions:
Once you’ve gathered your buckets in the desired number and size, you’ll want to paint them. If you want a more contemporary look, you might paint them all the same color. If you currently have a color theme in your yard, then you can choose a complementary color.
Choose your spray paint wisely. If you have metal buckets you might need a different paint than for plastic buckets. Not to worry; once you paint them they’ll all blend together nicely so it’s okay to have a mixture of materials. Also pay attention to the sheen. You might prefer a glossy sheen or a matt sheen depending on your style preferences.
Once the buckets have been painted and are dry, drill a few holes in the bottom of the buckets for drainage. Simply turn them upside down and place enough holes that water will be able to escape.
Line the bottom of each bucket with an inch or two of gravel, depending on the depth and size of the bucket. You really just need to be sure that the plant isn’t sitting in a puddle of water. Fill the bucket halfway to two thirds with your potting soil. Add your plants. Fill to the top with soil and water.
Position the buckets around your yard in groupings that look aesthetically pleasing and make sense. For example, if you planted tomatoes in one of your buckets then you’ll want to make sure that the plant gets some sun each day. Keep in mind that the buckets are probably small enough that you can move them easily.
Large buckets work well for vegetables and flower gardens. Smaller buckets work well for herbs. Use your imagination and have fun. This is also a recycled garden project that you can get your kids involved in.
Cinder Block Raised Garden Bed
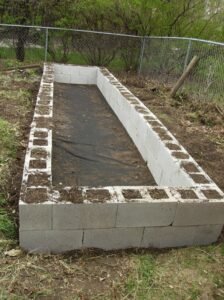
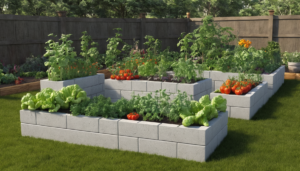
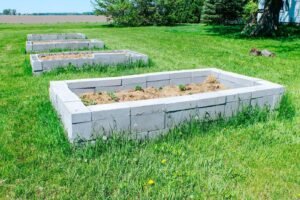
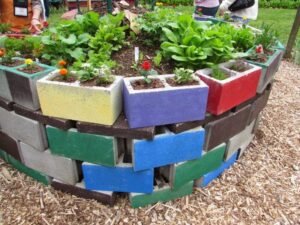
This one's a throwback, but trust me, it looks amazing. You'll need 8 cinder blocks for a standard bed, some spray paint if you want to get fancy, lawn fabric, potting soil, and plants. Level out your spot, lay down the fabric, arrange your cinder blocks, fill them with soil, and start planting. You can even get creative with the layout!
For this DIY lawn and garden craft you’ll need:
- Cinder blocks (eight blocks for a standard garden bed)
- Spray paint (if you choose to paint them)
- Lawn fabric
- Potting soil
- Plants
Directions:
The first step for this project is to plan out your garden bed(s). Decide if you’re going to go the traditional route and use cinder blocks as a standard raised garden bed. Another option is to tier them. The first row will be one block high, the second row will be two blocks high and so on. You can also get creative and create your own sculpture and design.
You can find used cinder blocks for sale online and at many garage sales. You can also check at recycling centers and home centers. They often have an abundance of extra construction materials available.
If you want to spray paint the cinder blocks then choose your paint and make sure it’s suitable for concrete blocks. You can also leave them in their natural state. This saves a step and an abundance of time and believe it or not, they look quite lovely in their natural state.
If you choose to paint them, green and black are common colors. You can also choose a glossy grey to just give them a nice sheen.
Clear a space. Make sure that the land where you’re positioning your cinder block garden is level and clear of grass and weeds. Place your landscape fabric down first. Then position your cinder blocks in your chosen design.
If you want taller raised garden beds, you can stack them two high into a square that is two bricks long and two bricks wide. You’ll need to make sure that you have enough soil to fill the interior of the bed.
Fill the interior of the bed with soil. Also fill the holes in the cinder blocks with soil. You can use this space to plant herbs, or it’s a fantastic place to plant flowers that repel bugs. For example, many plant-eating insects don’t like the smell of marigolds. Once your bed is full of soil you can begin adding your plants.
Cinder block gardens are a good use of leftover concrete blocks that otherwise end up in landfills. If you can’t find enough blocks, you can bridge the gaps with plywood found at your local recycling center or around your home. It adds a modern touch to the design.
Bowling Ball Art
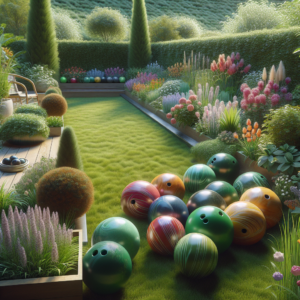
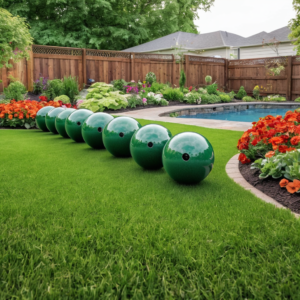
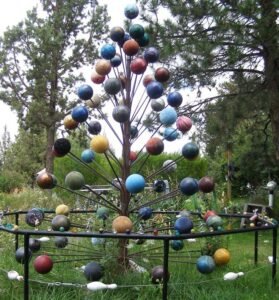
This is straight up art! You're going to want some bowling balls or other spheres, spray paint, sandpaper, and varnish. Sand them down, prime them, paint your design (glow-in-the-dark paint is sick!), seal them with varnish, and place them around your yard. It's like a funky sculpture garden!
For this DIY lawn and garden craft you’ll need:
- Spheres (as many as you wish and in varying sizes)
- Spray Paint
- Newspaper
- Medium or fine grit sandpaper
- Spray varnish
If you’re painting a design on your sphere then you’ll want the following items as well:
- Acrylic Paint
- Chalk
- Paintbrush
Directions:
The first step is to prep your bowling balls and spheres. Wash them well and then sand them to rough up the surface. The sanding is only necessary if they have a glossy surface. Spray the spheres with primer and let dry.
While the sphere is drying, create your design. For example, you might want to paint a ladybug on your sphere, a puppy dog, or you might want to paint it a solid color. Consider glow-in-the-dark paint for a fun effect.
Paint the ball. You may need several coats. And if you’re making a bug or painting a design on your sphere, then you’ll need to wait for each layer to dry. You can use chalk to draw your design before you start painting the details.
Once the sphere is complete, spray it with a spray varnish to seal the paint and to protect it from the elements. Look for exterior grade varnish. Place the balls in your yard per your design and enjoy. This is a great project for both adults and children.
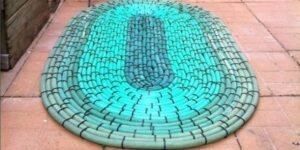
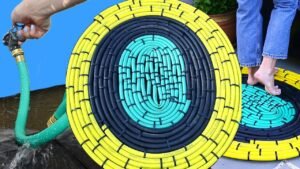
Garden Hose Outdoor Rug
Got an old hose? Cut it into pieces, grab a mat or some duct tape, glue, and heavy stuff to weigh it down. Wind that hose into a circle or a half-circle, glue it down, fill in the gaps, let it dry, and trim the edges. Bam! Recycled outdoor rug!
For this DIY lawn and garden craft you’ll need:
- Old hose
- Cork to place in the ends of the hose
- Scissors
- Twist ties
- Outdoor mat or car mat or duct tape
- Gorilla glue or other heavy duty adhesive
- Bricks (or something heavy to weigh down the hose)
- Clamps can be useful too but aren’t completely necessary
Directions:
There are actually a few ways to approach this project. One method is to wind the hose in circles. Start with one end and wrap the hose around itself into a circle. You can use twist ties to hold the hose together.
Once you have reached the end of the hose and have a full circle, you can use the glue to adhere the hose to the car mat or outdoor mat. If you choose this approach you can fill in the gaps between the hose with the glue as well. This helps it stay waterproof and keeps the hose together.
The other approach is to still fill the gaps with glue but you can then also back the hose with duct tape. If you live in a relatively dry climate then this works just fine. If you live in a rainy climate then the car mat or outdoor mat backing is a better option. Be sure to remove the twist ties before you glue the mat backing or the duct tape to the hose.
You can also choose to cut the hose into pieces and form a half circle on the mat instead of creating a large circular mat. This is where the bricks and/or the clamps can come in quite handy. As you lay down each cut piece of hose and create your mat, you’ll want to glue the pieces down and adhere them to one another. Let dry for a few minutes before adding the next piece of hose.
Fill the ends of the hose with cork and let everything dry. Once the mat is dry, you can trim away the excess tape or the mat to create a nice, smooth edge. A mat made from old garden hose can be used just outside your patio door.
You can use it under a bistro table, under planters or near your outdoor faucet. It adds a nice touch and is a great way to use an old hose instead of tossing it into the garbage. As a side note, this is also a good project for leftover rope and can be used for indoor mats and small area rugs.
Glass Jar Lanterns
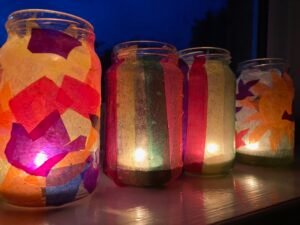
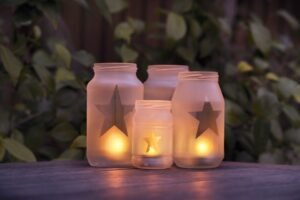
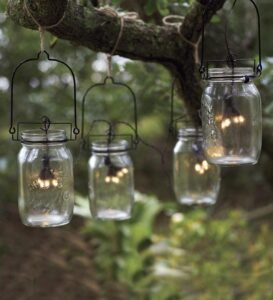
This is all about ambiance. Glass Jar Lanterns, baby! Snag some old Mason jars, adhesive shelf liner, frosted glass spray, sand, candles, and wire if you want to hang them. Cut out your design on the shelf liner, stick it on the jar, spray with frosted glass spray, remove the liner, add sand and a candle. Instant mood lighting!
For this DIY lawn and garden craft you’ll need:
- Glass jars (old Mason jars work perfectly for this craft)
- Sand
- Candles
- Adhesive-backed shelf liner
- Scissors
- Frosted glass spray
- Wire (You can also use wire hangers)
- Wire cutters
- Needle-nose pliers for working with the wire
- A pattern – for example, a leaf, a flower, polka dots
Note: The wire materials are only necessary if you’re hanging your lanterns. If you’re placing them on the ground or on a solid surface then you don’t need the wire or the cutters and pliers.
Directions:
The first step is to decide what design you want on your jars. For example, if you want your jars to have a leaf design then you’ll cut leaves out of your adhesive. You can also grab a leaf from the yard and trace them onto your adhesive-backed shelf liner. If you want to create horizontal stripes you can use masking tape. Create your pattern and cut them out with the scissors.
Clean the inside and outside of your jars. Then, to be sure that your tape and/or shelf liner will stick properly, wipe the outside of the jar down with rubbing alcohol. Once the jar is clean and dry, you can position your shelf liner or tape where you want it. Take your time with this step. You want the pattern to be well attached to the glass.
Once you’ve adhered your pattern to the jar, you can spray it with your frosted spray. Follow the directions on the spray can and pay attention to your distance from the jar as well as the thickness of the coating. Also, if you’re spraying them outside (which is recommended), be sure to pay attention to the wind direction.
Once the jars are dry, you can remove the adhesive pattern. Fill the bottom of each jar with about three inches of sand. Using wire or a wire coat hanger, fashion a hook for the jar. You’ll want to make sure that the wire is wrapped securely around the neck of the jar.
Position your candle securely in the sand. You may want to push it down a half inch or so to make sure it doesn’t tip over.
Light the candle and hang the lanterns in your yard or position them along a walkway. These lanterns also make a nice centerpiece.
Bird Feeders
Something for our feathered friends. You'll need PVC pipe, pie tins or plates, paint, adhesive, sandpaper, a jigsaw, eye bolt, drill, nut, washers, and chain. Cut notches in the PVC for seed, prime and paint it, assemble with the plates and eye bolt, fill with seed, and hang it up. The birds will love you!
And of course, if you've got a feeder, you need a Bird Bath. Find an old lamp base and a shallow bowl. Remove the lamp guts, sand and paint the base, adhere the bowl to the top (make sure it's centered!), seal with epoxy, and fill 'er up with water. Birds got to stay fresh, too!
For this DIY lawn and garden craft you’ll need:
- PVC pipe approximately 4 inches in diameter or larger
- 2 pie tins or a small plate and saucer or a combination of items (this will be the top and bottom of your feeder)
- Primer
- Paint (spray paint is fine, or use acrylic paint)
- Adhesive
- Sandpaper
- Jigsaw
- Eye bolt or screw-in hook (used to hang your feeder). It needs to be the full length of the feeder, from the top plate through the PVC to the bottom plate.
- Drill and bit large enough for your eye bolt. If you’re using a ceramic plate for your feeder, you’ll want a tile drill bit to prevent the plate from cracking.
- Nut
- Two washers
- Chain or other material to hang the feeder from
Directions:
The first step is to gather your pieces of equipment. You can use plates, saucers, pie tins or whatever you have on hand. The top component will be to keep the birds dry, and will also be used to attach your eyebolt to. The bottom component will be for the birds to perch on and it’s where you will place the birdseed.
In between these two dishes will be your PVC pipe. You may need to cut the pipe to the right height if your eye bolt is too short. Cut three small notches in the base of the PVC. This is where the seed will come out to feed the birds. Each one needs to be large enough for the seed to move through.
Sand the PVC and prime it. Then paint the PVC in whatever style or design you choose. Drill a hole in the top plate and the bottom plate. Glue the top plate to the PVC. Let dry. Slide the eye bolt through the top plate and through the PVC.
Place one washer on either side of your bottom plate and screw in the eye bolt, using your nut to keep the bolt in place. Once you’re sure it all fits together, undo the bolt and fill the PVC with seed. Reattach the bottom plate and hang the feeder.
Bird Bath
For this DIY lawn and garden craft you’ll need:
- Old lamp base (you don’t need the shade)
- Spray primer
- Spray paint
- Wide, shallow bowl for bath
- Clear epoxy
- Sand paper
- Newspaper
Directions:
Once you’ve found your lamp base and your shallow bowl, it’s time to prepare the bird bath base. Remove the socket and cord from the lamp. You may need wire cutters to cut the cord from the lamp and pull it through.
Sand the base if it is glossy, to allow the primer and paint to adhere. Using the newspaper to protect your grass, patio, or furniture, prime the base and allow it to dry. Once the primer is dry, you can paint the base.
You can create whatever pattern or design you like. For example, you can paint the base purple and then add yellow polka dots. You can paint the base a glossy red or white and black stripes. You may need to add several coats of paint before it is the right color and sheen.
Once the paint is completely dry, find the center of your bowl. This is important. If the bowl is off center, when it fills with water the bath can tip over. Adhere the bowl to your lamp base.
Note: If the top of your lamp base is narrow, you might want to grab a ceiling light canopy. These can be easily attached to your lamp base and will give you a larger, flat surface to adhere your bowl to. Paint the ceiling canopy before you attach it to your lamp base and let it dry.
Finally, paint the bird bath with epoxy and let it dry completely. Position your bird bath in your yard near your feeder or near shrubs and trees so the birds feel they have a safe place to hide when danger is present. Fill with water. It’s important to keep the water in the bird bath clean. You’ll prevent algae from growing and you’ll attract more birds.
Soda Bottle Elevated Planters
This one's adorable. Cut the top off some soda bottles at an angle, paint them, drill a hole in the bottom, stick a rod through with washers on each end, add soil and a little plant. It's like a little recycled garden army!
For this DIY lawn and garden craft you’ll need:
- Soda bottles. They should have a rounded base.
- Bamboo or metal rods approximately two feet long
- Paint (spray or acrylic)
- Soil
- Plants
- Newspaper
- Drill
- Washers (one for each planter)
- Superglue
Directions:
Clean the inside and outside of your soda bottles. You’ll need to remove the plastic label from the outside. Cut the bottles to the same height. Cut the top off on the bias, on a diagonal. Then your plants will be easier to see and they’ll look like they’re nestled in the planter. You might experiment with a few soda bottles to find the best angle and depth. Try to keep at least half the bottle for your planter.
Carefully spray paint the prepared and cut soda bottles. You might want to paint them with a few light coats to prevent dripping. You can tip them upside down on the newspaper to dry. For the best pop, consider a glossy spray paint in a bright color. For example, you might choose pink, orange, or teal.
Paint the bamboo or metal rods the same color and let dry. Drill a hole in the bottom of the soda bottle. Glue the washer to the metal rod and run it through the painted soda bottle. You can also glue the washer to the bottom of the soda bottle. This washer prevents the rod from slipping through.
Tip the planter upside down. Place super glue on the bottom of the soda bottle around the rod, which now looks like a stem. Slide another washer over the stem and adhere it to the bottom of the small planter. Now you have a washer on the inside and the outside, holding the stem and the planter in place.
Position the planters in your garden or yard where you want them. You might have to sink the stem down a few inches to make sure it’s stable. Add a bit of sand or soil to the inside of the planter and add your succulent or flower.Recycled Fence or Art Piece
Collect some salvaged metal sheets and lumber, decide on your size, cut them down, and either frame them up or link them together. Instant industrial chic!
For this DIY lawn and garden craft you’ll need:
- Salvaged metal. For example, sheets of corrugated metal and tin tiles
- Salvaged lumber
- Tin snips
- Gloves to protect your hands
Directions:
Once you’ve decided the size of your fence, you can cut the metal to the appropriate size. For example, you might cut them into two by two foot squares. You can create a frame with salvaged wood for your fence and position the corrugated metal tiles within the framework of your fence structure. Dig post holes, mount your fence to two posts and set them in the ground. You’ll need to use cement to fix the posts in the ground.
Another option is to link the corrugated metal sheets together using chain links or other fasteners. You’ll need a punch to create holes in the sheets to link them together. You can then suspend the fence or artwork from a large beam of wood or from a metal rod and mount it to your home.
There are a number of options here and you can let your imagination work with you to create a look that feels right for your space and design style. For example, for a uniform look you might use just a few different types of metal in a few colors. For a more varied look you might alternate patterns, colors, and styles to give it an eccentric feel.
Conclusion
Using recycled materials to create functional and artistic lawn and garden pieces doesn’t have to be complicated. There are projects that can be accomplished in an afternoon using pieces that you already have at home. And if you feel like really digging in and making something substantial then you can find a recycled yard project that’s a bit more involved.
So there you have it, my eco-friendly friends - 10 awesome ways to spruce up your outdoor space with recycled materials. It's all about getting creative, having fun, and doing a little good for the planet while you're at it.
I hope this has gotten your gears turning and you're feeling inspired to get out there and start upcycling! Trust me, your yard will thank you, and so will the environment.
Until next time, keep on keeping things green!
